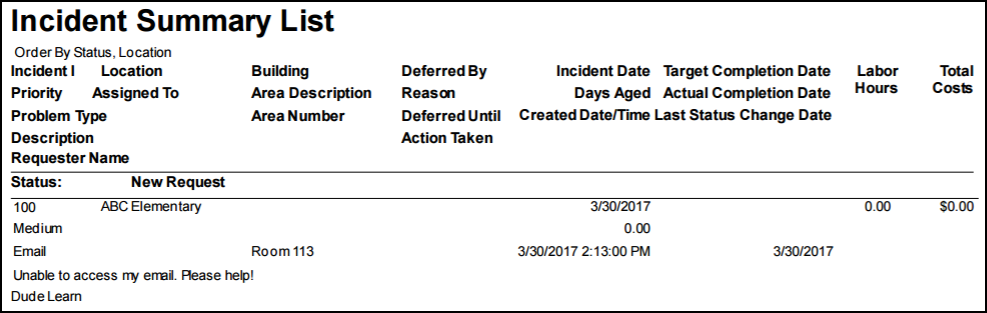
Incident Summary 2
- What it does - You can filter this report by any of the fields available on the incident form and it provides a nice breakdown of each incident. The Incident Summary 2 includes the incident status, the current assigned to, the requester, days aged, labor hours, total costs and more. It can also be grouped by location, problem type, purpose, assigned to, etc. and provide you with a total for each grouping as well as a grand total.
- Why it's great - This is a great high-level all-encompassing summary report. It works really well as a Saved Action where you can save and schedule the report to run on a regular basis. It helps you keep your finger on the pulse of what's going on at your organization.
- Where to find it -
- Click on Report in the Actions menu, and then click on Incidents.
- Enter the criteria for your report, making sure to select Summary Report 2 in Step 22.
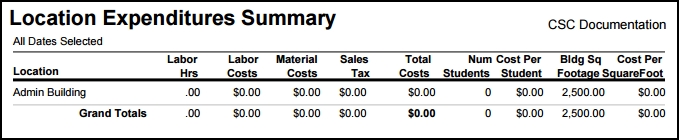
Location Summary
- What it does - The Location Summary provides a nice roll-up for each location including the total labor hours and labor costs, material costs, and a total cost by facility. The report also includes some great additional information: the cost per student as well as the cost per square foot.
- Why it's great - This report provides a great breakdown of how resources (monetary, time, etc.) have been allocated to each location by providing line item results for each facility.
- Where to find it -
- Click on Report in the Actions menu, and then click on Locations.
- Enter the criteria for your report, making sure to select Summary Report in Step 6.
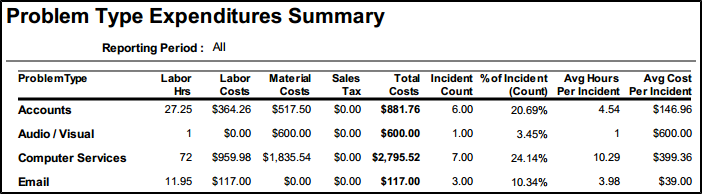
Problem Type Summary
- What it does - The Problem Type Summary includes the number of hours that have been dedicated to each problem type, the number of work orders per problem type, and the cost for labor and materials. The report also includes some great additional information: the average hours, cost per incident, and the total percentage of work each problem type accounts for.
- Why it's great - This report provides a great breakdown of where your resources (monetary, time, etc.) have been spent in relation to the type of work being done.
- Where to find it -
- Click on Report in the Actions menu, and then click on Problem Types.
- Enter the criteria for your report, making sure to select Summary Report in Step 9. Select Problem Type in the drop down box to sort your report result by Problem Type rather than Location.
Detail Employee Cost Report
- What it does - This report provides a great breakdown of each employee and the total number of hours they've tracked for the given reporting period. The report also includes the average number of hours each employee enters per incident, the average number of days it takes them to complete an incident, as well as the total number of incidents they worked on during the time period identified.
- Why it's great - The Detail Employee Cost Report is a great report to track and manage the work load of each of your employees. The report can be generated for a single employee, a team of employees, or all employees.
- Where to find it -
- Click on Report in the Actions menu, and then click on Employees.
- Enter the criteria for your report, making sure to select Detail Employee Cost Report in Step 10.
.png)
Transaction Detail (To Excel)
- What it does - This report not only includes important information about the transactions entered on an incident, but also the incident information itself. For every transaction returned on the report, the report provides the transaction type, transaction description, quantity, costs, etc. as well as the incident description, location, problem type, purpose code, etc.
- Why it's great - The Transaction Detail is a great report to open with Excel. You will be able to use the data to create some very meaningful and powerful charts and tables to illustrate an employee's workload, the total costs allocated to various vendors/suppliers, etc. This report can be setup as a Saved Action to stay on top of labor hours as well as labor, material, and contracted service costs.
- Where to find it -
- Click on Report in the Actions menu, and then click on Transactions.
- Enter the criteria for your report, making sure to select Detail Report in Step 16.
![]()
Asset Master List (To Excel)
- What it does - This Asset Master List provides a complete snapshot of your assets. The report can be generated to include assets for a particular location or group of locations, classification, supplier, etc. The report results return all of the available fields on an asset from the item name, number and description to the operating system, manufacturer, and life expectancy of the unit.
- Why it's great - The Asset Master List is great for anyone who plans to leverage the asset import tool in Incident. The spreadsheet can be used as a template to populate asset information. The template can then be used to import assets into the asset inventory.
- Where to find it -
- Click on Report in the Actions menu, and then click on Asset Inventories.
- Enter the criteria for your report, making sure to select Master List in Step 13.

